
For a custom pectoral implant for aesthetic augmentation, I typically think of the design in terms of six major specification categories:
1. Overall Dimensions
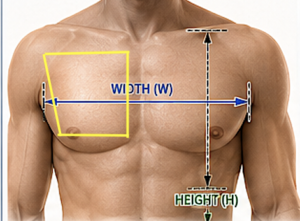
When it comes to creating the implant’s dimensions it is not about the overall height and width of the chest but the mimicking the outline of the pectoralis major muscle on the anterior ribcage. Think of it as a near rectangular shape with more vertical height than width.
Base Width (BW)
- Medial sternal border to nipple.
- Typical range:: 12–14 cm
- Never any lower than the horizontal nipple level
Superior Width (SW)
- Superior border below the clavicle.
- Upper sternal border to anterior axilla
- Typical range:16–18 cm
Sternal Height (SH)
- Upper to lower sternal border.
- Upper border at horizontal level of the anterior axilla
- Lower sternal border at horizontal nipple level
- Typical range:15–17 cm
Lateral Border Height (LBH)
- Nipple to anterior axilla
- Typical range:15–18 cm
Maximum Projection (P)

- Determines chest prominence.
- Often at upper pole of the implant
- Les projection at interior end of implant
- Typical range:
- Mild augmentation: 1.5–2.5 cm
- Moderate: 2.5–4 cm
- Large: 4–6 cm+
2. Regional Thickness Map
Rather than a single projection value, a custom implant should have a thickness distribution.
Upper Pole Thickness
Controls clavicular fullness.
Central Thickness
Creates the dominant pectoral bulk.
Lower Pole Thickness
Influences inferior chest contour.
Example:
|
Region |
Thickness |
|
Superior |
35mm |
|
Central |
30 mm |
|
Inferior |
15 mm |
Ensures good upper pole projection.
3. Medial Border Design
One of the most important aesthetic variables.
Aggressive Medial Extension
- Creates greater cleavage.
- Popular in cosmetic male augmentation.
Conservative Medial Extension
- Safer.
- More natural appearance.
- Useful for reconstruction.
Typical distance:
- Implant edge 1–2 cm lateral to sternum.
4. Lateral Border Design
Determines chest width.
Options:
Standard
Ends at anterior axillary line.
Extended
Protrudes behyound the lateral muscle border.
Useful for:
- Bodybuilder physiques.
5. Edge Characteristics
Tapered Edge
- Preferred for modest and moderate augmentation
- Less visible.
- Better blending.
Feathered Edge
- Gradual reduction to 0–2 mm.
- Almost never used
Defined Edge
- More dramatic contour.
- Higher palpability risk.
Typical peripheral edge:
- 1 cm +
6. Posterior Surface Geometry
The back surface should match the chest wall.
Flat Posterior Surface
- Simpler.
- Works in most cosmetic cases.
Curved Posterior Surface
- CT-derived.
- Better fit.
- Less dead space.
- Less implant mobility.
For custom implants, I strongly prefer a CT-derived posterior surface.
Advanced CAD Parameters
When designing from CT data, additional variables include:
X-Axis
Medial-lateral contour.
Y-Axis
Anterior projection.
Z-Axis
Superior-inferior contour.
Chest Wall Curvature Radius
Determines posterior conformity.
Implant Volume
Calculated from the CAD model.
Typical custom pectoral volumes:
|
Implant Type |
Volume |
|
Small |
100–150 cc |
|
Medium |
150–250 cc |
|
Large |
250–400 cc |
|
Very Large |
400–700+ cc |
Unlike breast implants, the effect of volume is synergistic with implant shape and projection.
Manufacturing Specification Example
Custom Right Pectoral Implant
- Material: Solid silicone elastomer
- Base Width: 15 cm
- Medial Sternal Height: 17cm
- Medial Sternal Height 16cm
- Lateral Axillary Line Height 17cm
- Maximum Superior projection: 3.8 cm
- Maximum Inferior Projection. 2.0cm
- Volume: 385 cc
- Posterior surface: CT-matched curvature
- Surface finish: Smooth
- Orientation marker: lateral border but can be made intraop by hand
This type of specification package is generally sufficient for a custom implant manufacturer to generate a production-ready CAD model.
Dr. Barry Eppley
Plastic Surgeon