

The evolution from intraoperatively molded augmentation materials to patient-specific implants has fundamentally changed forehead augmentation surgery. Earlier techniques required wide surgical exposure to permit direct molding and contour refinement during the operation. In contrast, custom implants are fully designed before surgery, allowing the operative procedure to focus on precise placement rather than implant creation. This shift has reduced operative time, minimized surgical exposure, reduced scarring and improved both reproducibility and aesthetic accuracy.
Successful implantation depends on three fundamental principles: complete subperiosteal exposure, accurate implant positioning, and stable fixation. Because the implant reproduces a precisely designed three-dimensional contour, even minor errors in pocket development or implant orientation may compromise the final aesthetic result. Consequently, the surgical objective is not simply implant insertion but exact reproduction of the digital surgical plan.
Incision Planning
Incision placement is determined primarily by implant size, implant extension, hair characteristics, and patient anatomy rather than by a single standardized approach.
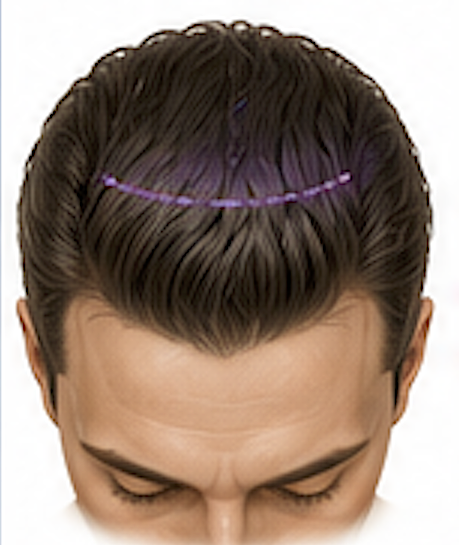 For most patients, a limited scalp incision located several centimeters posterior to the frontal hairline provides adequate access. Typically measuring 6 to 8 cm in length, this incision is well concealed within the hair-bearing scalp while allowing direct access to the entire forehead below it..
The greatest advantage of patient-specific silicone implants is their flexibility. Unlike rigid implants or intraoperatively molded materials, silicone implants can be temporarily rolled or folded during insertion and then resume their predetermined shape once positioned within the subperiosteal pocket. This property allows even large implants to be inserted through relatively small incisions without compromising implant integrity or contour accuracy.
Patients with sparse hair density, advanced male pattern baldness, or extensive implant designs require individualized incision planning. In these patients, minimizing visible scarring becomes as important as the implant itself. Limited incisions frequently determine whether surgery is acceptable to the patient and therefore should always be incorporated into the preoperative design process.
Subperiosteal Pocket Development
Following incision, dissection proceeds in the subperiosteal plane over the frontal bone. This avascular tissue plane provides optimal implant support, minimizes postoperative mobility, and preserves the overlying soft tissue envelope.
Pocket development extends inferiorly to the supraorbital rims and laterally to the planned implant boundaries. When the implant extends beyond the anterior temporal lines, dissection continues beneath the temporalis fascia to create a continuous recipient pocket. Careful release of fascial attachments along the temporal transition allows the implant to blend naturally across the frontotemporal junction without producing visible contour steps.
Endoscopic assistance is frequently advantageous during this stage. Magnified visualization facilitates identification and preservation of the supraorbital and supratrochlear neurovascular bundles while ensuring complete release of the periosteum across the inferior forehead. Endoscopy is particularly valuable for extended implants, where precise pocket development through limited incisions would otherwise be difficult.
The implant pocket should reproduce the planned implant dimensions without unnecessary over-dissection. Excessively large pockets increase the potential for implant migration or rotational malposition, whereas incomplete release may prevent the implant from seating fully against the underlying bone.
Implant Insertion
Before insertion, the implant is irrigated with antibiotic solution and oriented according to the preoperative design. Although patient-specific implants generally fit only one position, verification of superior-inferior orientation and right-left alignment should always be performed before placement.
The implant is gently rolled along its long axis and introduced through the scalp incision. Once inside the pocket, it is allowed to unfold naturally while being guided into its predetermined position. Sequential digital palpation confirms complete expansion of the implant and identifies any folds or incomplete seating.
Extended implants frequently require gradual advancement from superior to inferior while alternating gentle traction and digital manipulation to ensure that the temporal extensions unfold smoothly beneath the surrounding soft tissues. Because the implant precisely matches the underlying skeletal anatomy, excessive force is rarely necessary. Difficulty during insertion usually indicates incomplete pocket development rather than an implant problem.
Verification of Implant Position
Accurate positioning is confirmed through direct visualization, digital palpation, and external assessment of forehead contour. The implant margins should not be palpable as abrupt edges, and the transition into the surrounding forehead should appear smooth across the entire augmented surface.
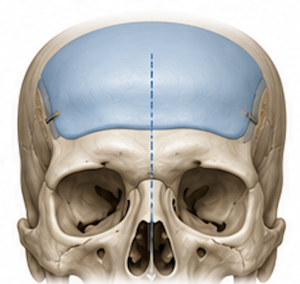 Particular attention is directed toward the brow transition, temporal contours, and superior extension into the anterior cranial vault. These regions are most susceptible to contour irregularities if the implant has not fully seated against the bone.
Symmetry is assessed both by direct inspection and by palpation from multiple viewing angles. Because the forehead is highly reflective and visually unforgiving, even minor contour discrepancies are more easily appreciated before wound closure than during postoperative healing.
Implant Fixation
Although accurate pocket design provides substantial implant stability, rigid fixation is recommended for nearly all custom forehead implants.
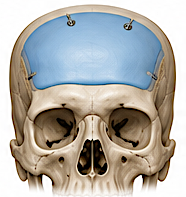 One or two low-profile titanium microscrews placed through the superior portion of the implant provide immediate positional stability while avoiding palpable hardware in aesthetically sensitive regions. Superior fixation also prevents inferior migration during the early postoperative healing period before fibrous tissue integration occurs.
For extended implants, additional fixation points may occasionally be placed laterally or posteriorly depending on implant size and geometry. Fixation should stabilize the implant without distorting its designed contour.
Wound Closure
Following final irrigation, meticulous hemostasis is confirmed before closure. Because even small postoperative hematomas may compromise contour accuracy or increase infection risk, complete hemostatic control is essential.
The galea is reapproximated with interrupted absorbable sutures, followed by layered skin closure designed to preserve surrounding hair follicles. Incisions should be oriented parallel to the direction of hair growth whenever possible to optimize scar camouflage.
Routine drains are generally unnecessary following limited-incision implant placement. A lightly compressive dressing is applied overnight to reduce early edema and minimize potential dead space.
Surgical Pearls
Several technical principles consistently improve outcomes:
- Design the pocket to match the implant rather than enlarging the pocket to facilitate insertion.
- Never force implant placement; resistance almost always indicates incomplete subperiosteal release.
- Verify contour from multiple viewing angles before fixation.
- Prioritize smooth temporal transitions over maximal central projection.
- Conservative augmentation is usually more successful than aggressive projection.
- Remember that millimeters matter. Across the broad surface of the forehead, a difference of only 1 to 2 mm may substantially alter the final aesthetic appearance.
Dr. Barry Eppley
Plastic Surgeon